Last updated: 25 June 2023
If you’ve been reading Roaming Required for awhile then you probably know that we love being connected to the Internet. In fact, that’s where the name of our blog came from, Roaming was most definitely Required.
However, our preferred method of keeping connected is either through WiFi or getting a local SIM card when we arrive in a new city. We’ve done this in many countries and have written about our experiences in Poland, Latvia, and Ukraine.
We Love Staying Connected
We love to remain connected for a variety of reasons;
- Access to Google Maps for directions to our hotel, restaurant, and bars
- Information on landmarks, tourist attractions, and closing times
- And sharing our travels with you, our readers ❤️
I can categorically say that buying a SIM card in Bangkok was the quickest and easiest purchase we’ve ever had!

I don’t think any city we’ve been to has had a SIM card process this simple and easy and that includes back home in Sydney!
Buying a SIM Card from Bangkok Airport
From the moment we touched down at Suvarnabhumi Airport it was pretty obvious that a lot of tourists must require a SIM card because there were multiple signs advertising phone deals throughout the airport – from immigration to customs to baggage claim to the arrival hall.
Once we’d cleared immigration and customs we decided to check out the SIM card deals and the signs in the arrivals hall directed us to Gate 7.
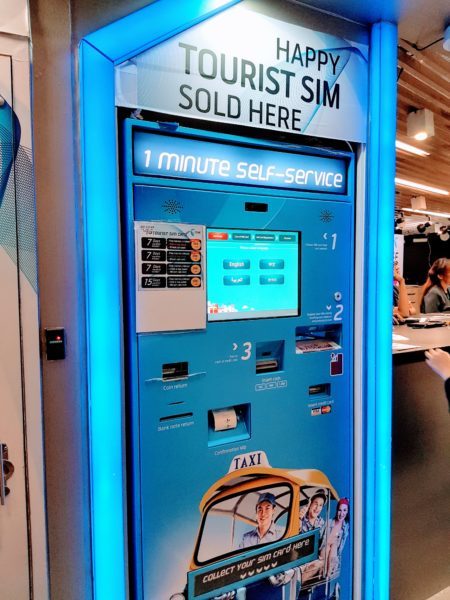
At Gate 7 I knew we were in the right place because we could see kiosks setup with all the phone and data deals (similar to the setup of car rental desks). The first thing we noticed when approaching the desk was a huge self-service SIM card machine that said “1 MINUTE SELF SERVICE”
Say what?!? You heard me. First time either of us has seen one so of course we checked it out!

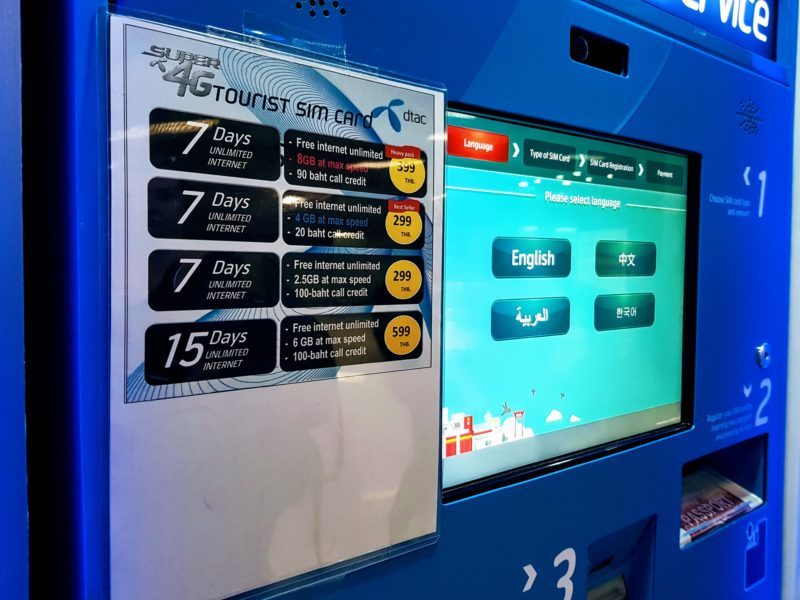
Between us, we discussed the options and tried to figure out how much data we’d need for our 4 days in Bangkok and decided on the 299 Baht (£6) option which would give us 4GB of data.
Given that it was 2am in the morning and it wasn’t really that busy, the girl at the counter came around to us and helped us purchase our SIM. As it popped out of the vending machine, she proceeded to activate it and even placed it in my phone and made sure we walked away with a working Thai phone number!

What do you think the total transaction time was? This includes the purchase, activation, taking out my SIM card and placing in the new one?
Grand total of 2 min! Amazing!
I think Roma and I needed a couple of minutes after the purchase to wrap our heads around how quick and easy the entire process was! It’s never, and I mean NEVER, been that simple.
What Do You Need To Do?
If you’re looking at picking up a local Thai SIM card when you land at Suvarnabhumi Airport, head to the Gate 7 when you clear immigration & customs. You can visit either the Self Service machine or the team at the first desk.
Quick. Easy. Affordable.

[…] bloggers, is there anything more important than being connected? That’s why we LOVE this post from Roaming Required that has the simplest, fastest way to get connected in […]